I LOVE getting Christmas cards, don’t you? First of all, there’s just something so thrilling about getting letters in the mail that aren’t junk. But I also love displaying them for the season – they’re like little works of art, each one unique and beautiful! It’s personal and meaningful holiday decoration, daily reminders of the people that love and care about you. So when it comes time to put away the Christmas decorations, it’s always hard for me to pack up the Christmas cards – let alone throw them away!
I’ve seen this DIY Christmas Card Ornament idea several places, but was excited when I found this great tutorial via Scoutie Girl on how to make your own using a craft punch and an exacto knife. But cutting and scoring each circle by hand (you need 20 to make 1 ornament!) didn’t appeal to my impatient side. I knew there had to be an easier way…
A-ha! My Silhouette! Using the cut and score setting, I created my own cut file to create these ornaments a whole lot faster.
You’ll find the FREE Silhouette Studio cut file for this project (along with dozens of others) in my Silhouette Library! Enter your email address below to get instant access.
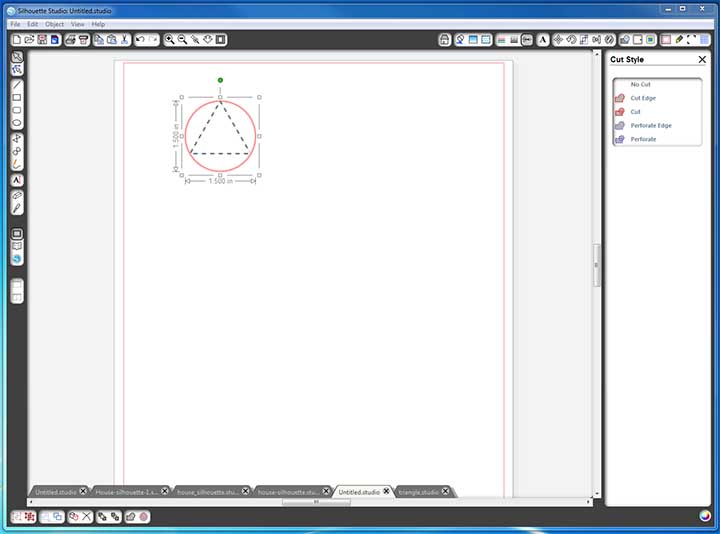
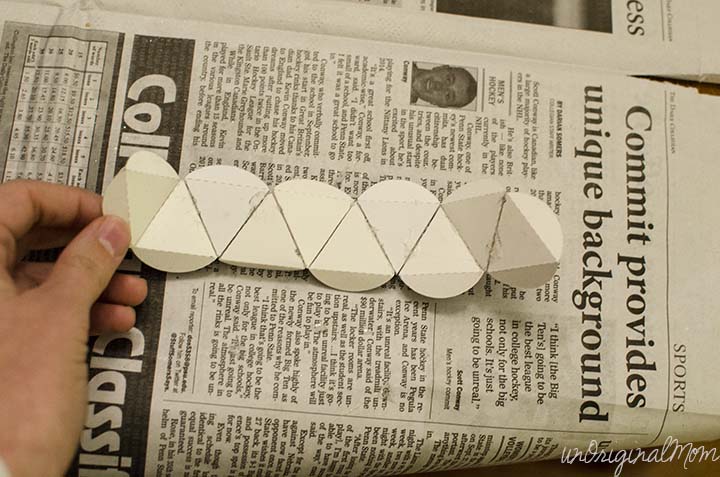
The ornament pieces are really very simple – just a circle with an equilateral triangle inscribed in it. The trick is under cut style:
You want the outer circle to be set to CUT, and the triangle to be set to PERFORATE. When you’re in the cut style window, it will show up like a dotted line. When you exit the window, it will go back to the regular red outline, but don’t worry – it’s still set to perforate. (If you’re using the free cut file, you don’t need to worry about any of this – it’s already done!)
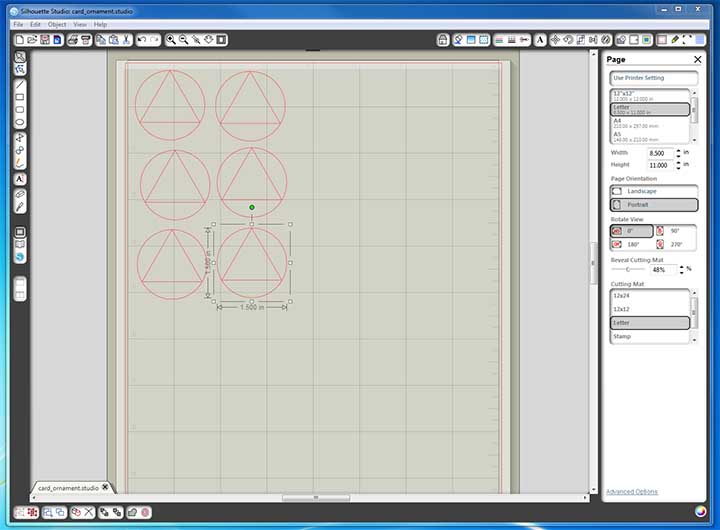
Then, depending on the size of the card you’re cutting, you can duplicate the shape to cut several circles out of the same card. It doesn’t have to be uniform – if you really like the colors in the center of the card but not around the edges, move the circles to be clustered around the center instead.
And, of course, you can change the size of your circles to make smaller or larger ornaments – but remember, you need 20 of the same sized circles to make one ornament.
When you’re satisfied with the layout of your circles, place your card on your mat and cut! (I used the regular card stock cut settings for most of the cards, but if they were especially thick I increased the blade depth.)
Head on over to Scoutie Girl for a great tutorial on how to put your circles together into an ornament. Just a few tips and tricks from my experience:
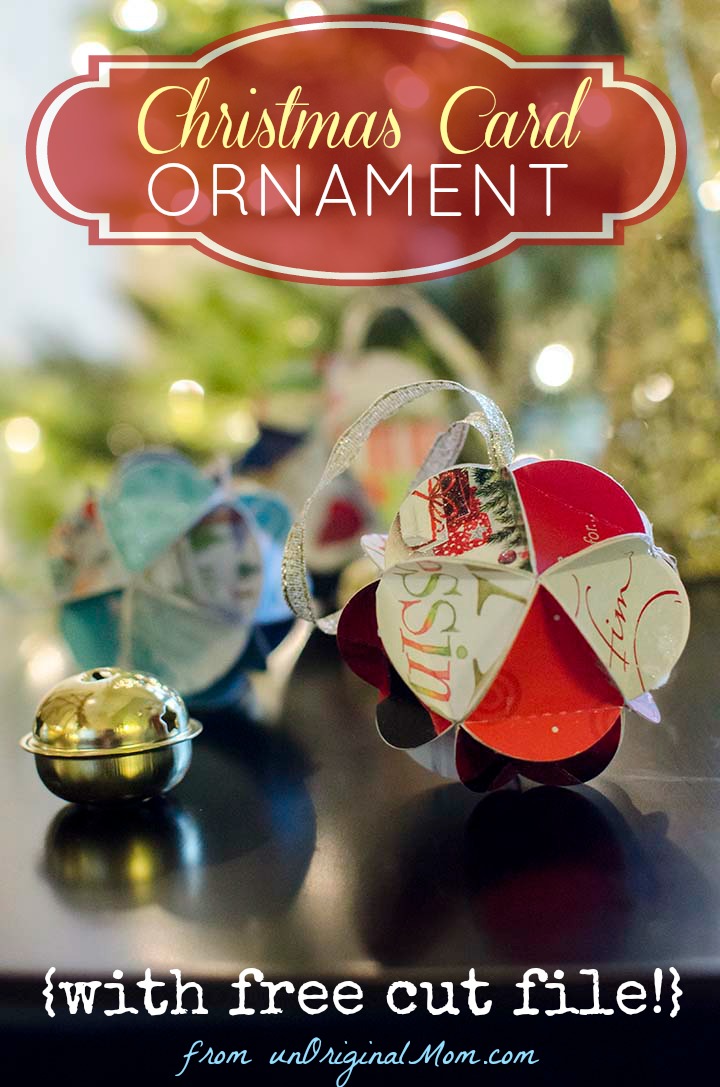
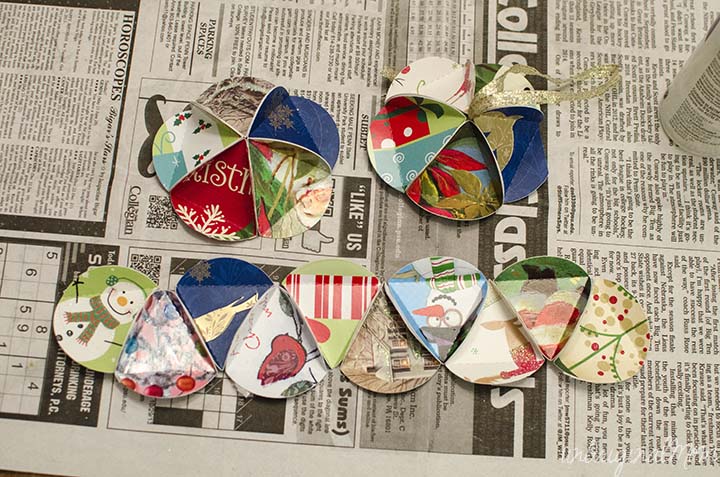
Lay out your circles and plan your ornament first – you’ll want to try to make sure that you don’t have any of the same card right next to each other. You can even try alternating colors if you want, like my red and white ornament (pictured at the top of this post).
Use hot glue. I tried using clear tacky glue for the first ornament, and I felt like I needed about 5 hands to hold it all together since the circles kept sliding. It didn’t turn out very well. For the next ornament, I used a thin bead of hot glue to attach the circles. A little bit goes a long way, and it’s not as forgiving so you’ve got to have them perfectly lined up – but I found it much easier to be precise and get all my corners to line up.
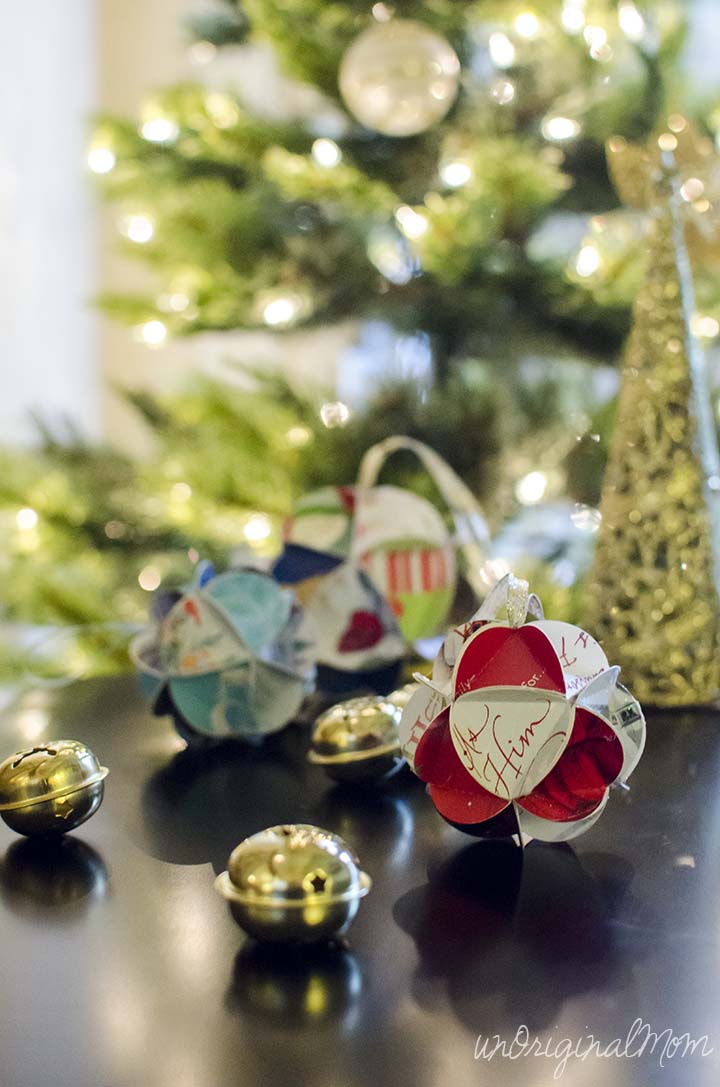
Be creative! You can put like colors all together in one ornament, or make it completely random. It doesn’t have to just be red and green, either – I think the blue one I made is my favorite! Don’t have any Christmas cards lying around from previous years? Head to the dollar store and buy some! Or use pretty decorative paper from the craft store. Or have your kiddos scribble on some card stock with colored markers or crayons, then cut that up to make your circles.
These would make great teacher or neighbor Christmas gifts, too! You could even fill it up with seasonal potpourri or scented herbs before you close it up to make a lovely smelling ornament or shelf decoration. There are so many great possibilities!
Looking for some more Silhouette inspiration? This post is part of the November Silhouette Challenge, organized by Lauren at The Thinking Closet! My Silhouette Challenge buddies are all sharing projects today on their blogs, so browse through the links below for a blog-hopping good time!
DIY Ironing Board Hanger by The Turquoise Home
Silhouette Challenge: Time Zone Bathroom Art by Nearly Handmade
Santa’s Christmas Countdown by Tried & True
Nautical Anchor Pillow Tutorial by The Thinking Closet
Thanksgiving and Christmas Dual Sign by Architecture of a Mom
Itching to Etch by Get Silvered
Snowman Tag ~ Silhouette Challenge by Whats Next Ma
Thanksgiving Sign by Chicken Scratch NY
DIY Horse Silhouette Pillow by Rain on a Tin Roof
Sketching on Fabric by The Sensory Emporium
Paper Leaf Garland by Lil’ Mrs. Tori
Christmas Pillow by Create & Babble
Glass Painting with Reverse Stencils by Givemeapaintbrush
Chalkboard Thankful Tree by Cutesy Crafts
Bottoms Up! MYO Wine Tag by From Wine to Whine
‘Happy Holly-days’ Tags for the Swap by An Elegant Touch…
Thank You for Dinner (Card) by Everyday Paper
Advent Star Christmas Countdown by My Favorite Finds
Geometric Fabric Bowls by Please Excuse My Craftermath…
Paper Carnival by Home At Eight
Silhouette Cameo Tutorial: Dual Sided Business Cards by Black and White Obsession
In Case of Emergency Baby Bag Tags by Tossed Salad Life
Christmas On My Mind by Creative Turn
Jingle all the Way! by My Paper Craze
Christmas Lights Garland by Making Home Base
We Are Thankful by 4 You With Love
Seattle Skyline Silhouette by Sowdering About in Seattle
DIY Stenciled Mugs by Coley’s Corner
I hope you’ve been inspired by these fabulous ideas! Happy Holiday-Crafting!









These are really great! I must confess, I keep all of my Christmas cards in a shoe box. >< I've added them to my ornament inspiration pinterest board!
Meredith, these ornaments are beautiful! I’ll be saving my cards from now on! I have to pin this!
I love it, Meredith! I always hesitate to cut cardstock, or similar textures, with my Cameo. These turned out so cute though!
What a great idea to use Christmas cards! I love it!
OMG, I’ve never seen such a thing!! These look FABULOUS! Love the final product and I love that I can recycle some of the cards we get during the season. Thanks for the inspiration!!
These ornaments are awesome! I just got my Silhouette a month ago, so THANK YOU for the cut and score info. I’m definitely going to have to try this for myself!
Great idea! Totally pinning this so I can do it with my kids!
It’s funny, as many times as I’ve used the Cut Styles window, I didn’t really notice that that was where you also can adjust settings to perforate your lines. Thanks for that VERY helpful tip! I feel less intimidated by projects that require “scoring” now.
And I love saving Christmas cards, too. In fact, now I feel more justified in that hoarder tendency, knowing I can repurpose those cards into stunning ornaments like these. Thanks for the tips and tricks you shared – – adding this to my Christmas crafts to do list!
Thanks for participating in this month’s Silhouette Challenge and for inspiring us with your creativity as always, Meredith!
Love this! I’m going to download the cut file and make some ornaments like this for our tree, but probably use some scrapbooking paper!
First of all, what a great name you have! ;-) Next….look out….you’ve just created a monster! I have loved those ornaments for some time, but never wanted to spend the time cutting and scoring…with your cut file, I don’t have to!!!! Thanks for the tips on putting them together, that’ll come in handy when I decide to make a million of these with my family later this season!
Cute idea and your ornaments are beautiful!
I always wondered how those went together. Now that I have seen this, I’m gonna make some for myself. Thanks for posting.
These are so great! Thanks for sharing your cut file as well. I save my Christmas cards every year and I punch two holes in them and put them on binder rings by year. Then the next Christmas I put the books out on the table so I can look through them and enjoy them again. Or I make gift tags out of them. I think I will try my hand at these and use them to decorate a mini tree.
What a great way to give old Christmas cards new life. Love it.
I’ve always loved these ornaments but have had a difficult time making the triangle fold lines…now you’ve solved all my problems! Thanks so much!
You’re brilliant to think of doing this with a Silhouette! Pinning!
Such a neat idea Meredith!! Love it!
Finally having a chance to go through all the Silhouette Challenge project inspiration– I’m like a [big] kid on Christmas but earlier!!
Wow, re-purposing Christmas cards, who would have thought?! I love how you incorporated the pretty colors and fonts used from the cards to create such a unique ornament! The angles and lines… they hit the spot on the mathy side of my brain haha!
Keep on being fabulous!!
Very cute! Looks like it takes a lot of patience. But definitely something I want to try this season. We get a lot of Christmas cards and I always feel terrible throwing them out.
I now know what i will do with the last Christmas card my mother gave me before she died
I LOVE these! I have been exhibiting some hoarder tendencies with the Christmas cardstock lately, so these would be a great way to use some up!
I really like the looks of these ornaments! I might struggle to make them correctly, so am bookmarking your page so I can come back for more instructions! Thanks for sharing this!
I love these. Pinning also. Linda
I love these. What a great way to use your old Christmas cards for new ornaments.
What a great idea!! I love the reuse of old Holiday cards. I’m hosting a pillow cover giveaway that you should enter. http://homecomingmn.blogspot.com/2013/11/michelle-dwight-designs-pillow-cover.html
[…] Christmas Card Ornament from unOriginal Mom […]
You already know I love these! I will be featuring them on Tell Me Tuesday. Have a great week! :)
[…] Living Vintage Christmas – The Colored Door // Christmas Card Ornament – Unoriginal Mom // Glammed Up Frame – Persia Lou Apple Candles – One Little Project // Gold […]
[…] Paper Star Ornament at DIO Home Improvement, 3- Christmas Card Ornament at UnOriginal Mom, 4- DIY Chalkboard Sign at Inspiration for Moms, 5- Simple Christmas Art […]
This is such a great idea for re-using old Christmas cards! Thanks for sharing this project at The Pin Junkie. It was featured in today’s Christmas decorating roundup. http://www.thepinjunkie.com/2013/12/christmas-decorating-ideas.html Hope you can stop by and grab a featured button and be sure to share your best Christmas crafts at tonight’s party for another chance to be featured.
My sisters, brother and I made these ornaments with my grandmother 45 years ago, I still have them, and I am so glad to see they are still being made!
Wow, that’s so special! They were new to me, but so neat to know the idea goes back so far!
Saved as a favorite, Chatting about how like your
website!
my website free download id hacking software
Wow, that’s a terrific idea. It is very cute and the creativeness in it, is awesome.
Thumbs up for you !!
[…] on your Christmas tree, besides it will aromatize the room with the specific Christmas scent. 25.DIY Christmas Card Ornaments with Free Cut File: Check out this super easy tutorial and learn how to make a Christmas Card Ornament. The tutorial […]
[…] love the idea of using last year’s Christmas cards for these DIY Chrismas Card Ornaments from Meredith of unOriginal […]
[…] it into an ornament. I found this great tutorial on paper ornaments. It focuses on recycling Christmas cards, but I found it works great for failed painting, too. In […]
[…] was inspired to create these paper accent balls by a post from Unoriginal Mom in a monthly silhouette challenge. She upcycled old Christmas cards to make her ornaments, but I […]
[…] Download Image More @ http://www.unoriginalmom.com […]
I couldn’t agree more about the joy of receiving Christmas cards! They truly are like little works of art that bring warmth and holiday cheer. The DIY Christmas Card Ornament idea is brilliant, and using a Silhouette for faster production is a game-changer. Thank you for sharing this creative and thoughtful way to repurpose these meaningful cards into beautiful ornaments!
I love Christmas cards too! Your idea to make ornaments from them is great. Can’t wait to try the Silhouette method. Thanks for sharing the cut file!